TL;DR
- Best overall: mono — no bot, local AI transcription, $50 once
- Best free: OBS Studio — no bot, requires setup, no transcription
- Built-in (visible): Teams native recording — notifies all, requires M365 license
- Bot-based: Otter.ai, Fireflies, Fathom — visible bot joins meeting
Quick Comparison
| Method | Price | Bot/Visible? | Transcription |
|---|---|---|---|
| mono | $50 once | No | Yes (local) |
| OBS Studio | Free | No | No |
| Teams Built-in | M365 license | Notification shown | Yes (cloud) |
| Otter.ai | $16.99/mo | Yes (bot joins) | Yes (cloud) |
Method 1: mono (Recommended)
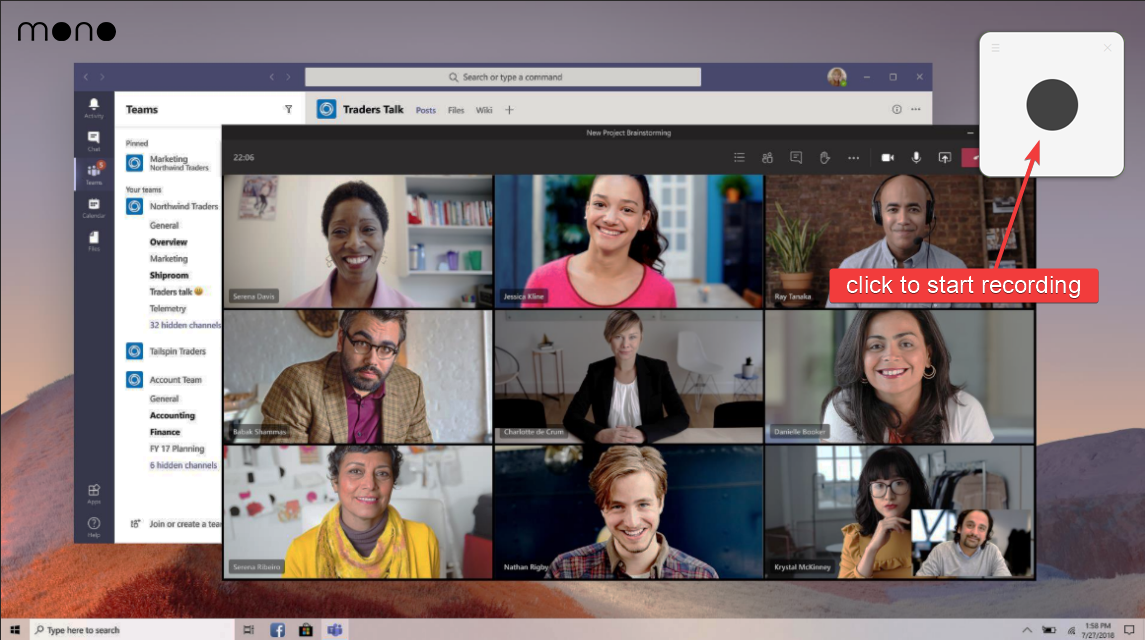
mono records Teams by capturing audio directly from your computer's sound output. No bot joins the meeting, no recording notification appears to other participants, and your audio never leaves your computer. This makes it ideal for recording meetings where you don't have admin permissions or want to keep notes private.
After you stop recording, mono transcribes the conversation locally using AI that runs entirely on your computer. It then generates a summary, extracts action items, and lets you chat with an AI about the meeting — all processed locally, nothing uploaded.
How to record Teams with mono
- Download mono from mono-ai.uk and install it
- Open mono and click the Record button to begin recording
- Join your Microsoft Teams meeting normally
- Participate in the meeting as usual
- When the meeting ends, click Stop in mono
- Wait for the automatic transcription to complete
- Review your transcript, summary, and action items
mono works with both the Teams desktop app and Teams in a browser. It captures everything playing through your speakers or headphones, so you'll get all participants' audio in high quality. You can search across all your recordings by keyword, making it easy to find specific discussions or action items.
Pros: No bot visible, no participant notification, local AI transcription with summaries and action items, AI chat about your meetings, works without admin permissions, searchable recordings, one-time $50 payment.
Cons: Paid software (one free recording available to try before purchasing).
Method 2: OBS Studio (Free)
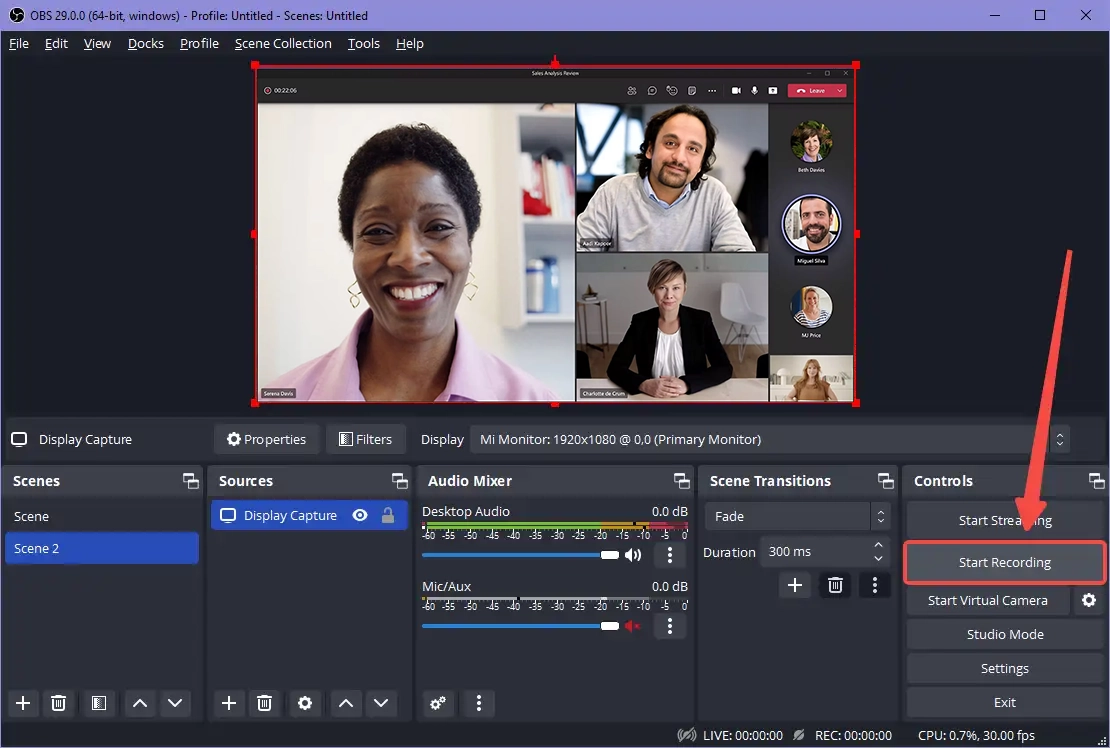
OBS Studio is a free, open-source screen recorder that can capture system audio and optionally your screen. It doesn't join the Teams meeting as a participant, so it's completely invisible to others. OBS is popular with streamers but works just as well for recording Teams calls.
The main limitation is that OBS outputs raw audio or video files without any transcription. You'll need to process the recording yourself if you want searchable text.
How to record Teams with OBS
- Download OBS Studio from obsproject.com and install it
- Open OBS and go to Settings → Audio
- Set "Desktop Audio" to your playback device (speakers or headphones)
- In the main window, click + under Sources
- Add an "Audio Output Capture" source for audio-only recording
- Optionally add "Window Capture" and select Microsoft Teams for video
- Click "Start Recording" before joining your Teams meeting
- Join and participate in your Teams meeting
- Click "Stop Recording" when the meeting ends
- Find your recording in the output folder (usually Videos)
Pros: Completely free and open source, no bot visible, can record video with window capture, highly configurable with advanced audio settings.
Cons: Requires initial setup, you must manually start and stop recording for each meeting, no transcription — produces raw audio/video files only.
Method 3: Teams Built-in Recording
Microsoft Teams has native recording functionality, but with significant limitations. You need a Microsoft 365 Business Basic, Business Standard, or Enterprise license. The meeting organizer or someone in the same organization must start the recording. All participants see a "Recording has started" notification — there's no way to record discreetly.
Recordings are stored in OneDrive (for non-channel meetings) or SharePoint (for channel meetings). They're available for 120 days by default before expiration. Teams also offers live transcription, but it requires additional licensing and administrator setup.
How to use Teams built-in recording
- Join or start a Microsoft Teams meeting
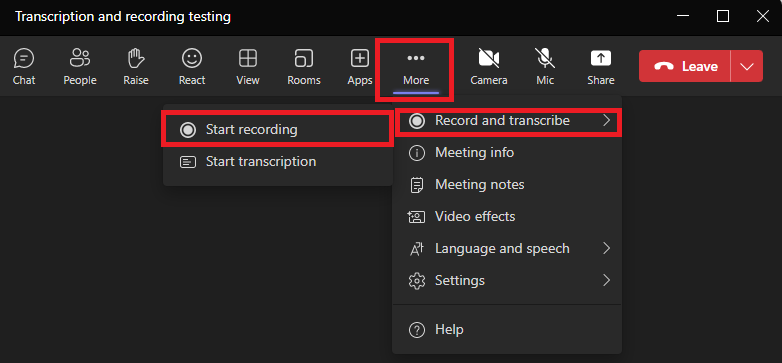
- Click the three dots (More actions) in the meeting controls
- Select "Start recording" from the menu
- A notification appears to all participants that recording has started
- When finished, click More actions → Stop recording
- Find the recording in the meeting chat or your OneDrive
Pros: No additional software needed, includes cloud transcription on supported plans, recordings saved to OneDrive/SharePoint with sharing options, integrates with Microsoft 365 ecosystem.
Cons: Requires M365 Business/Enterprise license, visible notification to all participants, recordings expire after 120 days by default, stored in cloud (privacy concern for some), requires admin to enable transcription.
Method 4: Bot-Based Recorders (Otter.ai, Fireflies, Fathom)
Tools like Otter.ai, Fireflies, and Fathom work by joining your Teams meeting as a bot participant. The bot appears in the participant list with a name like "Otter.ai's Notetaker" or "Fireflies.ai Notetaker." Your audio is uploaded to their servers for transcription.
These tools offer team features, CRM integrations, and AI-generated summaries. However, everyone in the meeting sees the bot, which can be problematic in client calls or sensitive discussions. Some organizations block these bots entirely.
Pros: Easy setup, high-quality transcription, AI summaries and action items, team collaboration features, integrations with Salesforce, HubSpot, and other tools.
Cons: Bot is visible to all participants, audio uploaded to third-party cloud servers, monthly subscription fees ($10–30/month), may be blocked by IT policies, creates awkwardness in client meetings.
Teams vs Copilot vs Third-Party Tools
Microsoft's Copilot in Teams (part of the $30/month Copilot for Microsoft 365 add-on) provides AI meeting summaries, action items, and real-time transcription. However, Copilot doesn't replace meeting recording — it augments it. You still need Teams recording enabled to capture the full meeting.
Key difference: Copilot generates summaries from Teams' built-in transcription, while third-party bots (Otter.ai, Fireflies) join your meeting as participants. Starting May 2026, Microsoft is restricting third-party bots from accessing Teams meetings via their API, pushing organizations toward native tools.
Why this matters: If you rely on bot-based recorders, you may lose access when Microsoft enforces these restrictions. Local recording tools like mono work independently of Microsoft's API — they capture your system audio directly, so they'll continue working regardless of policy changes.
| Feature | Teams Built-in | + Copilot | Third-Party Bots | Local (mono) |
|---|---|---|---|---|
| Recording | Yes (cloud) | Yes (cloud) | Yes (cloud) | Yes (local) |
| Transcription | Requires admin | Real-time | Real-time | Local AI |
| AI Summaries | No | Yes | Yes | Coming soon |
| Visibility | All notified | All notified | Bot visible | Not visible |
| Data location | Microsoft cloud | Microsoft cloud | Third-party cloud | Your device |
| May 2026 changes | Unaffected | Unaffected | Blocked | Unaffected |
| Cost | M365 license | +$30/month | $10-30/month | $50 once |
Troubleshooting Recording Issues
Recording not working in Teams? Here are the most common issues and how to fix them:
"Start Recording" is greyed out: This happens when your admin has disabled recording, you don't have the required M365 license (Business Basic or higher), or you're an attendee rather than organizer/presenter. Ask your IT admin to check the Teams admin center → Meeting policies → Recording settings.
Recording stops or fails to save: Check your OneDrive/SharePoint storage quota. Teams recordings require available cloud storage. If storage is full, the recording may stop mid-meeting or fail to process. Free up space or contact IT to increase your quota.
Transcription not available: Transcription requires your admin to enable it in Teams admin center, and it's only available in certain languages. Go to Settings → Captions and transcripts to check if it's enabled for your account.
Can't download the recording: After a meeting ends, recordings take time to process (typically 5-30 minutes). If it's been over an hour, try signing out and back into Teams. Also check the meeting chat or SharePoint/OneDrive — recordings appear in different locations depending on meeting type.
Poor audio quality in recording: Teams records exactly what it receives. If participants have poor connections or use laptop speakers instead of headphones, the recording will reflect that. For important meetings, ask participants to use headsets and stable internet connections.
Need to record without these limitations? Local tools like mono bypass Teams' permission system entirely — they capture audio at the system level, so they work regardless of your Teams role, admin policies, or license tier. You'll get a recording even if you're just an attendee with no recording permissions.
Teams Recording Permissions
Microsoft Teams has specific policies about who can record:
Organizers and co-organizers: Can always start recording if enabled by admin.
Presenters: Can record if the organizer grants permission or if admin policy allows.
Attendees: Cannot use built-in recording, but can use third-party tools like mono or OBS.
External guests: Cannot use built-in recording. Third-party tools work regardless of your role in the meeting.
Recording Video vs Audio Only
Teams meetings include video, but you don't always need video recording:
Audio-only (mono): Captures the conversation with automatic transcription. Often sufficient since most recordings are for documentation, not visual reference. Files are small and searchable.
Full video recording (OBS/Teams built-in): Captures video of participants or shared screens. Useful for training sessions, presentations with visual content, or when you need to reference what was shown. Files are much larger.
Legal Considerations
Before recording Teams meetings, understand the legal requirements:
One-party consent: Many jurisdictions allow recording meetings you're participating in without notifying others.
All-party consent: Some regions require everyone to agree. This includes California, Illinois (BIPA), Germany, and other areas.
Many organizations have internal policies requiring disclosure when recording. Check your company's guidelines and consider the nature of the meeting — internal team standups have different expectations than client calls or interviews.
Tips for Recording Teams Meetings
Use headphones to prevent echo and feedback. Close other applications that might produce notification sounds. Test your setup before important meetings with a quick recording.
Check audio levels: Make a short test recording to ensure all participants are audible. Teams sometimes has inconsistent volume levels between speakers.
Stable connection: Poor internet affects Teams audio quality, which affects recording quality. Use a wired connection for important meetings when possible.
Desktop app vs browser: Both work with third-party recording tools. The desktop app typically has better audio quality and lower latency.
Which Method Should You Use?
Need transcription without a bot? mono records locally and transcribes automatically without anyone knowing. Best for personal notes, sales calls, or when you don't have recording permissions.
Want free and don't need transcription? OBS Studio is reliable but requires setup and produces raw files.
Have M365 license and transparency is fine? Teams' built-in recording is simplest if you're the organizer and everyone expects recording.
Team with CRM integration needs? Bot-based tools like Fathom or Otter.ai offer team features and integrations, but everyone sees the bot and your audio goes to their servers.
Recording as a guest or external participant? mono or OBS are your only options — Teams built-in recording isn't available to external users.